Configuration Manager: Content Location Requests

Not that long ago I was challenged with the task of writing a piece of automation for a ConfigMgr Client to check if a specific package was available in it’s boundary; or commonly referred to as a “Content Location Request”. All I was able to find was Robert Marshall’s [MVP] postings for Content Location Request (CLR) Generator (and the Console Edition). The hints at the ConfigMgr SDK we’re clear, so I went ahead and installed it.

To get a jump start I began looking for examples and yet again found a post by Robert Marshall.

The best part here is this works with SCCM 2012 AND the latest Technical Preview that Microsoft has released for Configuration Manager vNext!

So, here we go! Content Location Request’s using C# or Powershell!

With the ConfigMgr SDK installed we’ll be focusing on the Client Messaging SDK: C:\Program Files (x86)\Microsoft System Center 2012 R2 Configuration Manager SDK\Samples\Client Messaging SDK. Inside this folder you’ll see a Sample.cs file and help file (most important!). if you decide to go beyond what I do here, you’ll want to keep the help file close by! Navigating up and in the Redistributables folder you’ll find the Microsoft.ConfigurationManagement.Messaging.dll.

Loading Files

If using Visual Studio, add a reference to the Messaging dll and the appropriate using reference. While you’re at it add a using statement for System.Diagnostics if one does not already exist.

C#

using System.Diagnostics;
using Microsoft.ConfigurationManagement.Messaging.Framework;
using Microsoft.ConfigurationManagement.Messaging.Messages;
using Microsoft.ConfigurationManagement.Messaging.Sender.Http;

Powershell

[void] [Reflection.Assembly]::LoadWithPartialName("System.Diagnostics")
[void] [Reflection.Assembly]::LoadFile("c:\Microsoft.ConfigurationManagement.Messaging.dll")

When using the “LoadFile” method, you’ll need to put in the full path (no variables). In most cases this is an issue, especially if including the dll within the script path. Best way I’ve found is to us the Add-Type cmdlet (where a variable populated path is allowed) in a try block, then have a catch statement to copy the file and then call LoadFile. If using this in WinPE, you’ll NEED to do this due to the loadFromRemoteSouces default setting.

Powershell if anticipating WinPE:

$Script:CurrentDirectory = Split-Path -Parent $MyInvocation.MyCommand.Definition

try
{
   Add-Type -Path "$Script:CurrentDirectory\Utilities\Microsoft.ConfigurationManagement.Messaging.dll" | out-null
}
catch
{
   Copy-Item -Path "$Script:CurrentDirectory\Utilities\Microsoft.ConfigurationManagement.Messaging.dll" -Destination "x:\Microsoft.ConfigurationManagement.Messaging.dll" | Out-Null
   [void] [Reflection.Assembly]::LoadFile("x:\Microsoft.ConfigurationManagement.Messaging.dll") | out-null
}
[Reflection.Assembly]::LoadWithPartialName("System.Diagnostics")

Setting up Objects

Now that we have the necessary references and using statements we’ll need to create the objects used through the request:

C#:

HttpSender hSender = new HttpSender();

ConfigMgrContentLocationRequest clr = new ConfigMgrContentLocationRequest();

ConfigMgrContentLocationReply cmReply = new ConfigMgrContentLocationReply();

Powershell:

$httpSender = New-Object -TypeName Microsoft.ConfigurationManagement.Messaging.Sender.Http.HttpSender

$clr = New-Object -TypeName Microsoft.ConfigurationManagement.Messaging.Messages.ConfigMgrContentLocationRequest

$cmReply = New-Object -TypeName Microsoft.ConfigurationManagement.Messaging.Messages.ContentLocationReply

Setting Up the Request

Now with our objects setup, we can begin formulating the request. The first thing we’ll need to do is run the “Discover” method of the ConfigMgrContentLocationRequest object. Essentially this grabs the systems IP Addresses, Current AD Site, AD Domain and AD Forest.

Nothing too difficult right? Well, not exactly! The AD Domain and AD Forest discovery uses the ADSI COM object. Still no problem though, right? Well, not if you intend to use this within WinPE. We’ve got 2 options then: (1) Add the ADSI Plugin to our WinPE image (Thanks to Johan Arwidmark), or (2) build a try catch.

Since the ADSI plugin is not included with WinPE and not supported by Microsoft, we’ll just use a simple try/catch. However, there’s another catch, we’ll need to specify the domain and forest strings.

C#:

private string myDomain = "mydomain.com";
private string myForest = "myForest.com";

try
{
   clr.Discover();
}
catch
{
clr.LocationRequest.ContentLocationInfo.IPAddresses.DiscoverIPAddresses();
   clr.LocationRequest.ContentLocationInfo.ADSite.DiscoverADSite();
   clr.LocationRequest.Domain = new ContentLocationDomain() { Name = myDomain };
   clr.LocationRequest.Forest = new ContentLocationForest() { Name = myForest };

}

Powershell:

[string]$myDomain = "mydomain.com"
[string]$myForest = "myforest.com"

try
{
   $clr.Discover()
}
catch
{
   $clr.LocationRequest.ContentLocationInfo.IPAddresses.DiscoverIPAddresses()           $clr.LocationRequest.ContentLocationInfo.ADSite.DiscoverADSite()
   $clr.LocationRequest.Domain = New-Object -TypeName Microsoft.ConfigurationManagement.Messaging.Messages.ContentLocationDomain
   $clr.LocationRequest.Domain.Name = $myDomain
   $clr.LocationRequest.Forest = New-Object -TypeName Microsoft.ConfigurationManagement.Messaging.Messages.ContentLocationForest
   $clr.LocationRequest.Forest.Name = $myForest
}

Next we’ll need to setup the parameters for the request. For this we’ll need a Management Point fqdn, Management Point Site Code, Package ID, and Package Source Version.

C#:

clr.SiteCode = mySiteCode;
clr.Settings.HostName = myManagementPoint;
clr.LocationRequest.Package.PackageId = packageID;
clr.LocationRequest.Package.Version = packageVersion;

Powershell:

$clr.SiteCode = $ManagementPointSiteCode
$clr.Settings.HostName = $ManagementPoint
$clr.LocationRequest.Package.PackageId = $PackageID
$clr.LocationRequest.Package.Version = $PackageVersion

Now, perhaps one of my favorite things here, is that we can manually set the AD Site code and get a location request as if we were at a different location. This is especially nice if we don’t have access to systems in those specific AD Sites and want to test!

C#:

if (myCustomAdSite != null)
{
   clr.LocationRequest.ContentLocationInfo.ADSite = myCustomAdSite;
}

Powershell:

if ($myCustomAdSite -ne $null)
{
   $clr.LocationRequest.ContentLocationInfo.ADSite = $myCustomAdSite
}

Next we’ll perform a validate on the message (ConfigMgrContentLocationRequest). This call validates that the message we have setup is good. If Validate fails, when the message is sent, it will undoubtedly fail as well. After validate we’ll send the request.

C#:

clr.Validate((IMessageSender)hSender);
cmReply = clr.SendMessage(hSender);

Powershell:

$clr.Validate([Microsoft.ConfigurationManagement.Messaging.Framework.IMessageSender]$httpSender)
$cmReply = $clr.SendMessage($httpSender)

Now we have our returned result! It will be returned as a string but in XML format. We can easily cast this into an XML object and do whatever we wish! Before returning the value, I’ve had some issues casting this due to a trailing  ” ” (Space) at the end of the string. Below is a quick loop that’ll take care of that, should it exist.

C#:

string response = cmReply.Body.Payload.ToString();

while (response[response.Length - 1] != '>')
{
   response = response.TrimEnd(response[response.Length - 1]);
}

Console.WriteLine(response);

Powershell:

$response = $cmReply.Body.Payload.ToString()

while($response[$response.Length -1] -ne '>')
{
   $response = $response.TrimEnd($response[$response.Length -1])
}

 Write-Output $response

Now we’ve got a nice neat Content Location Request! As you see below there’s quite a bit of information here. My primary accomplishment was checking that “SiteLocality” was “LOCAL” and there were LocationRecords.

Config Mgr 2012 R2 SP1:

<ContentLocationReply SchemaVersion="1.00">
   <ContentInfo PackageFlags="1073741825">
      <ContentHashValues/>
   </ContentInfo>
   <Sites>
      <Site>
         <MPSite IISSSLPreferedPort="443" IISPreferedPort="80" SiteLocality="LOCAL" MasterSiteCode="P01" SiteCode="P01"/>
         <LocationRecords>
            <LocationRecord>
               <ADSite Name="MyADSite"/>
               <IPSubnets>
                  <IPSubnet Address="xxx.xxx.xxx.xxx"/>
                  <IPSubnet Address=""/>
               </IPSubnets>
               <Metric Value=""/>
               <Version>8239</Version>
               <Capabilities SchemaVersion="1.0">
                  <Property Name="SSLState" Value="0"/>
               </Capabilities>
               <ServerRemoteName>myServer.Domain.com</ServerRemoteName>
               <DPType>SERVER</DPType>
               <Windows Trust="0"/>
               <Locality>LOCAL</Locality>
            </LocationRecord>
         </LocationRecords>
      </Site>
   </Sites>
   <RelatedContentIDs/>
</ContentLocationReply>

Config Mgr Technical Preview 4 (v1511):

<ContentLocationReply SchemaVersion="1.00">
   <BoundaryGroups BoundaryGroupListRetrieveTime="2015-12-06T22:19:36.400">
      <BoundaryGroup GroupID="16777217"/>
   <BoundaryGroups/>
   <ContentInfo PackageFlags="16777216">
      <ContentHashValues/>
   </ContentInfo>
   <Sites>
      <Site>
         <MPSite IISSSLPreferedPort="443" IISPreferedPort="80" SiteLocality="LOCAL" MasterSiteCode="P01" SiteCode="P01"/>
         <LocationRecords>
            <LocationRecord>
               <URL Signature="http://myServer.Domain.com/SMS_DP_SMSSIG$/XXX#####" Name="http://myServer.Domain.com/SMS_DP_SMSPKG$/XXX#####"/>
               <ADSite Name="MyADSite"/>
               <IPSubnets>
                  <IPSubnet Address="xxx.xxx.xxx.xxx"/>
                  <IPSubnet Address=""/>
               </IPSubnets>
               <Metric Value=""/>
               <Version>8325</Version>
               <Capabilities SchemaVersion="1.0">
                  <Property Name="SSLState" Value="0"/>
               </Capabilities>
               <ServerRemoteName>myServer.Domain.com</ServerRemoteName>
               <DPType>SERVER</DPType>
               <Windows Trust="0"/>
               <Locality>LOCAL</Locality>
            </LocationRecord>
         </LocationRecords>
      </Site>
   </Sites>
   <RelatedContentIDs/>
</ContentLocationReply>

These seem to differ ever so slightly from 2012 R2 (SP1) to v1511. There’s an added “BoundaryGroups” element and “URL Signature” Element as well. However, nothing that would (at least right now) prevent this code from running and working!


Full Code

C#:

// Set up the objects
HttpSender hSender = new HttpSender();

ConfigMgrContentLocationRequest clr = new ConfigMgrContentLocationRequest();

ConfigMgrContentLocationReply cmReply = new ConfigMgrContentLocationReply();

// Discover (the try/catch is in case the ADSI COM
// object cannot be loaded (WinPE).
try
{
 clr.Discover();
}
catch
{
   clr.LocationRequest.ContentLocationInfo.IPAddresses.DiscoverIPAddresses();
   clr.LocationRequest.ContentLocationInfo.ADSite.DiscoverADSite();
   clr.LocationRequest.Domain = new ContentLocationDomain() { Name = myDomain };
   clr.LocationRequest.Forest = new ContentLocationForest() { Name = myForest };
}

// Define our SCCM Settings for the message
clr.SiteCode = mySiteCode;
clr.Settings.HostName = myManagementPoint;
clr.LocationRequest.Package.PackageId = packageID;
clr.LocationRequest.Package.Version = packageVersion;

// If we want to "spoof" a request from a different
// AD Site, we can just pass that AD Site in here.
if (myCustomAdSite != null)
{
   clr.LocationRequest.ContentLocationInfo.ADSite = myCustomAdSite;
}

// Validate clr.Validate((IMessageSender)hSender); // Send the message cmReply = clr.SendMessage(hSender);

// Get response
string response = cmReply.Body.Payload.ToString();

while (response[response.Length - 1] != '>')
{
   response = response.TrimEnd(response[response.Length - 1]);
}

Console.WriteLine(response);

Powershell:

# Set up the objects
$httpSender = New-Object -TypeName Microsoft.ConfigurationManagement.Messaging.Sender.Http.HttpSender

$clr = New-Object -TypeName Microsoft.ConfigurationManagement.Messaging.Messages.ConfigMgrContentLocationRequest

$cmReply = New-Object -TypeName Microsoft.ConfigurationManagement.Messaging.Messages.ContentLocationReply

# Discover (the try/catch is in case the ADSI COM
# object cannot be loaded (WinPE).
try
{
   $clr.Discover()
}
catch
{
   $clr.LocationRequest.ContentLocationInfo.IPAddresses.DiscoverIPAddresses() $clr.LocationRequest.ContentLocationInfo.ADSite.DiscoverADSite()
   $clr.LocationRequest.Domain = New-Object -TypeName Microsoft.ConfigurationManagement.Messaging.Messages.ContentLocationDomain
   $clr.LocationRequest.Domain.Name = $myDomain
   $clr.LocationRequest.Forest = New-Object -TypeName Microsoft.ConfigurationManagement.Messaging.Messages.ContentLocationForest
   $clr.LocationRequest.Forest.Name = $myForest
}

# Define our SCCM Settings for the message
$clr.SiteCode = $ManagementPointSiteCode
$clr.Settings.HostName = $ManagementPoint
$clr.LocationRequest.Package.PackageId = $PackageID
$clr.LocationRequest.Package.Version = $PackageVersion

# If we want to "spoof" a request from a different
# AD Site, we can just pass that AD Site in here.
if ($myCustomAdSite -ne $null)
{
   $clr.LocationRequest.ContentLocationInfo.ADSite = $myCustomAdSite
}

# Validate
$clr.Validate([Microsoft.ConfigurationManagement.Messaging.Framework.IMessageSender]$httpSender)

# Send the message
$cmReply = $clr.SendMessage($httpSender)

# Get response
$response = $cmReply.Body.Payload.ToString()

while($response[$response.Length -1] -ne '>')
{
   $response = $response.TrimEnd($response[$response.Length -1])
}

 Write-Output $response

Enjoi!

WinPE and .NET (Part 3): WPF OSD Task Sequence Wizard

Introduction

In Part 1 we saw how to create the necessary DLL to prepare a Visual Studio Solution for use within a Task Sequence. In addition, we looked at some sample code about what it takes to get the value of a Task Sequence Variable. In Part 2 we looked at setting Task Sequence Variables and how we can leverage a .NET application to, not only get the value of a Task Sequence variable, but to set the value of one as well.

In part 3 we’ll be taking those concepts and applying those to a WPF application for a nice and simple OSD Boot Wizard!

WpfOSDWiz_Final

I’ll be going over my example in detail which should give you the basic concepts of how this works! Please feel free to style the application as you see fit for your needs and your company! My hope is that this gives you the information and inspiration you need to make your own WPF OSD Wizard! I’ll be using Visual Studio 2013 Professional but the express version should match up well for all that we are doing.

If you have not already, referencing Part 1, you need to: extract and create our DLL (If you did this in Part 1, you can reuse this DLL).

Basic Solution Setup

Open Visual Studio, go to File-> New Project…

On the left, expand Installed> Templates> Visual C# and Select Windows Desktop.

Select WPF Application, and set a name for your solution. I’ll be using the name “MyWpfOsdWizard”.

CreateSolution

Right click the MyWpfOsdWizard in the Solution Explorer and select “Properties”.

On the Application tab make sure you Target framework is set to “.NET Framework 4”.

We’ll get into the design in a bit, for now we’ll make sure that we have all the DLL’s referenced. This way, if you want to design all on your own, you’ve got the basic backbone functionality already in place.

In the Solution Explorer right-click References and select “Add Reference”. When the window pops up, click “Browse” and select the task sequence dll you created in Part 1 of my blog. Click OK.
AddReference

Now that this is referenced, we’ll add the helper class that I linked to in Part 2 of this series. I like to keep things organized, so right-click MyWpfOsdWizard in the Solution Explorer and select Add -> “New Folder”. Rename the folder “Classes”. Since this is a small project you don’t have to do this. I prefer to keep things organized and for other larger projects this has become a force of habit; and a good one at that! Navigate to my helper class and add the existing item. Right Click the Classes folder, select add> Existing Item, browse to the downloaded file and select OK.

Now we have all the necessary items added in and ready to go! Right now is the time when you should feel free to customize the look, feel and functionality of your Wizard; If you want! I’ll be continuing my example which (as seen in the above) will include a text box to set the Computer Name, set 5 custom Task Sequence Variables.

Setting up MainWindow

My design includes a Header, middle “frame”, and a footer. I style the wizard this way because if you’re using a highly customized MDT enabled Task Sequence, you may need more “pages” within your Wizard. We’ll only focus on one page in this example, but you can and should feel free to add in additional pages; for example, a summary page!

First we’ll need to set some settings for MainWindow. We’ll be setting a few Properties to create a front-most, full screen, non-sizable Window. Remove the Height and Width properties in you XAML code and add the necessary properties:

<Window x:Class="MyWpfOsdWizard.MainWindow"
   xmlns="http://schemas.microsoft.com/winfx/2006/xaml/presentation"
   xmlns:x="http://schemas.microsoft.com/winfx/2006/xaml"
   Title="My WPF OSD Wizard" WindowStyle="None" WindowState="Maximized"
   ResizeMode="NoResize" WindowStartupLocation="CenterScreen" Topmost="True">

We set “Title” which is self-explanatory. The other properties, again, are my preference for the style of the Window.

  • WindowStyle = This sets if we have a window border and what that looks like. Setting this to “none” makes it a borderless window. See the link for an example of each.
  • WindowState = Minimized, Maximized, or “Normal”. We’ll use Maximized to ensure that the Wizard is all you see.
  • ResizeMode = This sets whether or not we want the user to be able to resize a Window. In this instance we don’t want them to, so we set NoResize.
  • WindowStartupLocation = This property tells the application where to put the Window. Since we set Maximized in the WindowState property, this perhaps isn’t all that necessary, but putting a window in a nice center screen location is usually a nice practice. If you choose not to use the WindowsState = Maximized property, setting the WindowStartupLocation to CenterScreen will ensure a nice centered window.
  • TopMost = Often times with Wizards, I’ve seen people battle having their Window in front of the Task Sequence Startup exe (the one that you click “Next” to right after you boot). By setting the TopMost property to True, we ensure that we’ll always have our Wizard in the foreground.

In the MainWindow, I’ll have a nice header, a Frame making up the “body” and a footer. I like this look and feel it gives a nice definition to the Wizard.

Setup the grid which will define into a 3×3 scheme:

<Grid>
   <Grid.RowDefinitions>
      <RowDefinition x:Name="Header" Height="150"/>
      <RowDefinition x:Name="Content"/>
      <RowDefinition x:Name="Footer" Height="50"/>
   </Grid.RowDefinitions>
   <Grid.ColumnDefinitions>
      <ColumnDefinition Width="150"/>
      <ColumnDefinition/>
      <ColumnDefinition Width="150"/>
   </Grid.ColumnDefinitions>
</Grid>

Your grid will look like this:

MWGrid

Setting up the Header Now, let’s style the header! Immediately after the closing add another Grid for your Header.

<!-- Grid for Header -->
<Grid Grid.ColumnSpan="3">
   <Grid.RowDefinitions>
      <RowDefinition Height="1.5*"/>
      <RowDefinition/>
   </Grid.RowDefinitions>
</Grid>

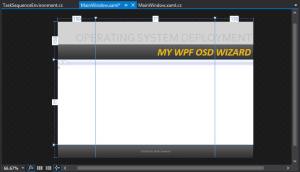
Inside of this grid we’ll create our styling elements for the header. There’s a bit of code here so I’ll summarize what we’re doing then give you the full output.

  • We’ll use the top half of our Header row as a Gray Rectangle with a text block “OPERATING SYSTEM DEPLOYMENT”. This will be aligned to the bottom right, have an opacity of 0.1, font size of 45 and font family of “Corbel”. We’ll use the Margin property to offset the right hand of this textblock.
  • The Bottom section will be a nice black to gray gradient background. We’ll add a textblock with a gradient brush, bold and italic. This will be aligned vertical center and to the right with a right-margin offset.

Code is here and image below of what this should look like now:

<!-- Grid for Header -->
<Grid Grid.ColumnSpan="3">
   <Grid.RowDefinitions>
      <RowDefinition Height="1.5*"/>
   <RowDefinition/>
</Grid.RowDefinitions>

<!-- Header -->
   <!-- Top Section -->
   <Rectangle Fill="LightGray"/>
   <TextBlock Text="OPERATING SYSTEM DEPLOYMENT" Margin="5"
      VerticalAlignment="Bottom" HorizontalAlignment="Right"
      FontSize="45" Opacity="0.1" FontFamily="Corbel"/>

   <!-- Bottom Section -->
   <Rectangle Grid.Row="1">
      <Rectangle.Fill>
         <LinearGradientBrush>
            <LinearGradientBrush.StartPoint>0.5,0</LinearGradientBrush.StartPoint>
            <LinearGradientBrush.EndPoint>0.5,1</LinearGradientBrush.EndPoint>
            <GradientStop Color="#363636" Offset="0"/>
            <GradientStop Color="#363636" Offset="0.02"/>
            <GradientStop Color="#616161" Offset="0.03"/>
            <GradientStop Color="#313131" Offset="1"/>
         </LinearGradientBrush>
      </Rectangle.Fill>
   </Rectangle>

   <TextBlock Grid.Row="1" Text="MY WPF OSD WIZARD" Margin="5"
      VerticalAlignment="Center" HorizontalAlignment="Right"
      FontFamily="Calibri" FontStyle="Italic" FontWeight="Bold"
      FontSize="40">
      <TextBlock.Foreground>
         <LinearGradientBrush>
            <LinearGradientBrush.StartPoint>0.5,0</LinearGradientBrush.StartPoint>
            <LinearGradientBrush.EndPoint>0.5,1</LinearGradientBrush.EndPoint>
            <GradientStop Color="#E8B100" Offset="0"/>
            <GradientStop Color="#E8B100" Offset="0.1"/>
            <GradientStop Color="#EABD1F" Offset="1"/>
         </LinearGradientBrush>
      </TextBlock.Foreground>
   </TextBlock>

</Grid>

FullGrid

Content Frame

The content section is incredibly simple…for now. We’ll use a frame to hold the XAML Page that we’ll create later. Not much to see here but our XAML code will look like this. Don’t worry…we’ll be back later to fill in the “Source” property. This code will go below your Header Grid (Not the Main grid from the window!–All your content stays inside of that Grid).

<!-- Content Frame -->
<Frame x:Name="contentFrame" Source=""
   Grid.Row="1" Grid.ColumnSpan="3"
   NavigationUIVisibility="Hidden"/>

Footer

The footer will be pretty simple. We’ll be using the same background gradient that we used in the bottom section of our header. We’ll have a center aligned TextBlock to contain whatever information you choose…copyright, contact support, hello world. Anything your heart desires. This code will go directly below your Content Frame section.

<!-- Footer -->
<Rectangle Grid.Row="2" Grid.ColumnSpan="3">
   <Rectangle.Fill>
      <LinearGradientBrush>
         <LinearGradientBrush.StartPoint>0.5,0</LinearGradientBrush.StartPoint>
         <LinearGradientBrush.EndPoint>0.5,1</LinearGradientBrush.EndPoint>
         <GradientStop Color="#363636" Offset="0"/>
         <GradientStop Color="#363636" Offset="0.02"/>
         <GradientStop Color="#616161" Offset="0.03"/>
         <GradientStop Color="#313131" Offset="1"/>
      </LinearGradientBrush>
   </Rectangle.Fill>
</Rectangle>

<TextBlock Grid.Row="3" Grid.ColumnSpan="3" Text="Created By Noah Swanson"
   VerticalAlignment="Center" HorizontalAlignment="Center"
   Foreground="#979797" FontSize="10"/>

Now we should have a well put together shell for our Wizard:

FullMainWindow

Now, If you’ve had experience with XAML, you’ve noticed that we use the same LinearGradientBrush in 2 places. So you may be asking “why not a resource dictionary?” The answer: Yes. This could very easily be put into a resource dictionary for easier use and integration. However, since we’d only have the one item, and to keep this example simple we’ll leave the code as is. If you want you can move this to a resource dictionary. If you’re adding more style and visual elements, you may make more use of one. MSDN Documentation on Resource Dictionaries can be found here.

Making the Page of our Wizard

The way we’re styling this, we have a Frame element in our MainWindow which will display our page. Not only does this help separate our Main Layout from our content, but also makes the app flexible in the event we want to add other pages, or reuse the same style for a completely different use.

In the Solution Explorer, right click MyWpfOsdWizard, Add-> New Folder. Name the folder “Pages”. Right-click the folder and select Add-> Page… When the Window pops up name your page “Landing.xaml” and click Add.
AddPage

The layout of the page will have a computer name field. We’ll add some validation logic to this field in case someone forgets about the 15 character limitation. Below that we’ll have 5 pairs of textblocks, one for a Variable Name and another for a Variable Value. These 5 pairs will represent 5 completely custom variables that can be set.

Open the Landing.xaml file. To give us a better workspace change the d:DesignHeight and d:DesignWidth to 600 and 800, respectively. If you’re wondering, setting d:DesignHeigh and d:DesignWidth does not affect the size of the page when the application is ran or compiled. “d” is declared with mc:Ignorable=”d”. Being that it is “Ignorable” the compiler will pay no attention to it. Since the properties are then DesignHeight and DesignWidth you really do take the “Design” part literally. Setting a “Height” or “Width” property in the Page element would set a size for the page and this would be bad. We want the page to automatically size itself to the frame we created in MainWindow. If you would set an actual Height and Width, you might get something ugly like this:
BadSize

However, it is perfectly safe and fair to use the default provided DesignHeight/Width properties without fear of a malformed looking application.

So first things first, setup the grid for the page.

<Grid>
   <Grid.ColumnDefinitions>
      <ColumnDefinition/>
      <ColumnDefinition Width="10"/>
      <ColumnDefinition/>
   </Grid.ColumnDefinitions>
   <Grid.RowDefinitions>
      <RowDefinition Height="Auto"/>
      <RowDefinition Height="Auto"/>
      <RowDefinition Height="Auto"/>
      <RowDefinition Height="Auto"/>
      <RowDefinition Height="Auto"/>
      <RowDefinition Height="Auto"/>
      <RowDefinition Height="Auto"/>
      <RowDefinition Height="Auto"/>
      <RowDefinition Height="Auto"/>
      <RowDefinition Height="Auto"/>
      <RowDefinition Height="Auto"/>
      <RowDefinition Height="*"/>
   </Grid.RowDefinitions>
</Grid>

We’ll add in a message in the first row indicating some instructions. In the second row we’ll have a nice black rectangle acting as a divider.

<!-- Instruction Header -->
<TextBlock Grid.ColumnSpan="3" HorizontalAlignment="Center" VerticalAlignment="Center"
   Text="Please enter a computer name and set any custom variables.
When complete, click Finish."
   Margin="0,10,0,10" FontFamily="Segoe UI" FontSize="15" TextAlignment="Center"/>
<!-- Rectagle Separator -->
   <Rectangle Fill="Black" Grid.Row="1" Grid.ColumnSpan="3" Height="3" Margin="0,10,0,10"/>

The third row is where we do something interesting. We’ll have a label in the left column. The TextBox will be contained in a horizontally oriented StackPanel. After the TextBox we’ll have a Dock Panel with some interesting code. The Dock Panel allows us to buddy up next to the TextBox. We’re stylizing it a bit making it color “OrangeRed” and then adding text inside of this from the “Segoe UI Symbol” font. The “Segoe UI Symbol” font is an amazing collection of symbols and icons that can be used easily! The character I chose will certainly bring attention to itself! Setting a tooltip is the text to display with you hover the mouse over it. XAML code of the Computer name section:

<!-- Computer Name Input and Validator -->
<StackPanel Orientation="Horizontal" Grid.Column="2" Grid.Row="2">
<TextBox x:Name="osdComputerName" Width="150" Height="20"
   VerticalAlignment="Center" HorizontalAlignment="Left"
   TextChanged="osdComputerName_TextChanged"/>
   <DockPanel LastChildFill="True" x:Name="computerNameErrIcon"
      ToolTip="Please enter a Computer Name!">
      <Border Background="OrangeRed" DockPanel.Dock="Right" Margin="5,0,0,0"
         Width="25" Height="25" CornerRadius="5">
         <TextBlock Foreground="White" Text="" FontFamily="Segoe UI Symbol"
            HorizontalAlignment="Center" VerticalAlignment="Center"/>
      </Border>
   </DockPanel>
</StackPanel>
<!-- Another separator -->
<Rectangle Fill="Black" Grid.Row="3" Grid.ColumnSpan="3"
Height="3" Margin="0,10,0,10" />

Over in your C# code it’s time to set the code for our “osdComputeName_TextChanged” event. Depending on the length of the osdComputerName TextBox, we’ll change the DockPanel’s visibility and tooltip.

private void osdComputerName_TextChanged(object sender, TextChangedEventArgs e)
{
   // Empty Computer Name
   if (osdComputerName.Text.Length < 1)
   {
      computerNameErrIcon.Visibility = System.Windows.Visibility.Visible;
      computerNameErrIcon.ToolTip = "Please enter a Computer Name!";
   }
   // Computer Name is Too Long
   else if (osdComputerName.Text.Length > 15)
   {
      computerNameErrIcon.Visibility = System.Windows.Visibility.Visible;
      computerNameErrIcon.ToolTip = "Computer Name cannot exceed 15 characters!";
   }
   // Computer Name is Good!
   else
   {
      computerNameErrIcon.Visibility = System.Windows.Visibility.Hidden;
      computerNameErrIcon.ToolTip = "";
   }
}

Now we need to add functionality for some custom Task Sequence Variables. We’ll start with a heading/title of sorts:

<!-- Custom Variables -->
<TextBlock Text="Set Task Sequence Variable Manually:" Grid.Row="4"
   HorizontalAlignment="Right" VerticalAlignment="Center"
   Margin="0,10,10,10" FontFamily="Segoe UI" FontSize="15" />
<TextBlock Text="Variable Name" Grid.Row="5"
   HorizontalAlignment="Right" VerticalAlignment="Center"
   Margin="0,10,70,10" FontFamily="Segoe UI" FontSize="13" />
<TextBlock Text="Variable Value" Grid.Row="5" Grid.Column="2"
   HorizontalAlignment="Left" VerticalAlignment="Center"
   Margin="20,10,0,10" FontFamily="Segoe UI" FontSize="13" />

Below this we’ll add this 5 times incrementing the x:Name and Grid.Row as we go:

<TextBox x:Name="osdVarNameOne" Grid.Row="6" Width="150" Height="20"
   HorizontalAlignment="Right" VerticalAlignment="Center"
   Margin="10"/>
<TextBox x:Name="osdVarValOne" Grid.Row="6" Grid.Column="2"
   Width="150" Height="20"
   HorizontalAlignment="Left" VerticalAlignment="Center"
   Margin="10"/>

One last thing to do and that is add a button to complete our wizard. Below the last TextBox set for our fifth variable, add a button. Rather than specify “Content” we’ll add a TextBlock inside our Button so we can style the font a bit. Make sure to name the button and add a Click event. We’ll be disabling this button by default.

<!-- Finish Button -->
<Button x:Name="finishButton" Grid.Row="11" Grid.Column="2"
   IsEnabled="False" Height="40" Width="100" Margin="40"
   HorizontalAlignment="Right" VerticalAlignment="Bottom" Click="Button_Click">
   <TextBlock Text="Finish" Margin="0,10,0,10"
      HorizontalAlignment="Center" VerticalAlignment="Center"
      FontFamily="Segoe UI" FontSize="15"/>
</Button>

Back in your MainWindow.xaml update your frame element to include your newly created Page:

<Frame x:Name="contentFrame" Source="Pages\Landing.xaml"
   Grid.Row="1" Grid.ColumnSpan="3"
   NavigationUIVisibility="Hidden"/>

Now if you run your application you’ll have a pretty good looking start!
WpfOSDWiz_Final

Now, let’s complete our code. Open Landing.xaml.cs. We’ll need to setup our finish button click event along with adding one small thing to our computer name TextChange. Let’s knock out the TextChange event first. Remember how we had our finish button disabled by default? We don’t care if the variables aren’t complete, but the computer name property we need to tie some rules to. We’ve already got basic logic in there for name length, so let’s disable the button if our computer name is too short or too long. We’ll simply flip the button’s IsEnabled property.

private void osdComputerName_TextChanged(object sender, TextChangedEventArgs e)
{
   // Empty Computer Name
   if (osdComputerName.Text.Length < 1)
   {
      computerNameErrIcon.Visibility = System.Windows.Visibility.Visible;
      computerNameErrIcon.ToolTip = "Please enter a Computer Name!";
      finishButton.IsEnabled = false;
   }
   // Computer Name is Too Long
   else if (osdComputerName.Text.Length > 15)
   {
      computerNameErrIcon.Visibility = System.Windows.Visibility.Visible;
      computerNameErrIcon.ToolTip = "Computer Name cannot exceed 15 characters!";
      finishButton.IsEnabled = false;
   }
   // Computer Name is Good!
   else
   {
      computerNameErrIcon.Visibility = System.Windows.Visibility.Hidden;
      computerNameErrIcon.ToolTip = "";
      finishButton.IsEnabled = true;
   }
}

Now, let’s tackle the finish button’s Click logic. We’re going to use our TaskSequenceEnvironmentClass to set any of the variable we defined. We’ll first create our instance of the TaskSequenceEnvironment and then set variable if the textboxes aren’t empty:

private void Button_Click(object sender, RoutedEventArgs e)
{
   Classes.TaskSequenceEnvironment tsEnv = null;

   // Get instance of the Task Sequence environment.
   try
   {
      tsEnv = new Classes.TaskSequenceEnvironment();
   }
   catch
   {
      MessageBox.Show("Unable to locate Task Sequence Environment!", "WinPE .NET Wizard");
      Application.Current.Shutdown(1);
   }

   // Set the Computer Name
   tsEnv.SetTaskSequenceVariable("OSDComputerName", osdComputerName.Text);

   //Set Variable One, if present
   if (osdVarNameOne.Text != "" && osdVarValOne.Text != "")
   {
      tsEnv.SetTaskSequenceVariable(osdVarNameOne.Text, osdVarValOne.Text);
   }

   //Set Variable Two, if present
   if (osdVarNameTwo.Text != "" && osdVarValTwo.Text != "")
   {
      tsEnv.SetTaskSequenceVariable(osdVarNameTwo.Text, osdVarValTwo.Text);
   }

   //Set Variable Three, if present
   if (osdVarNameThree.Text != "" && osdVarValThree.Text != "")
   {
      tsEnv.SetTaskSequenceVariable(osdVarNameThree.Text, osdVarValThree.Text);
   }

   //Set Variable Four, if present
   if (osdVarNameFour.Text != "" && osdVarValFour.Text != "")
   {
      tsEnv.SetTaskSequenceVariable(osdVarNameFour.Text, osdVarValFour.Text);
   }

   //Set Variable Five, if present
   if (osdVarNameFive.Text != "" && osdVarValFive.Text != "")
   {
      tsEnv.SetTaskSequenceVariable(osdVarNameFive.Text, osdVarValFive.Text);
   }

   Application.Current.Shutdown(0);
}

Now, you can safely compile and run your solution!

Deploying and Using your Wizard

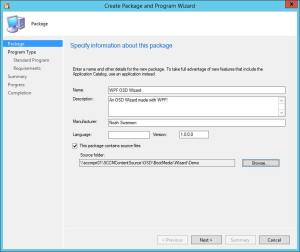
When you satisfied with your solution, compile it, and grab the EXE. Place this in a folder to be used as you SCCM Source for your package. In the Config Manager Console, create a new package from the Software Library Section under Application Management> Packages. Name the package “WPF OSD Wizard” set your source path and complete the rest of the information
CreatePackage

When prompted for a program select Do Not Create a Program. Complete the package creation wizard and replicate the content. Now we’ll need to create some boot media!

If you already have boot media skip this step, otherwise make sure you have the Windows ADK and MDT installed on your SCCM Server to create boot media. Right click Boot Images and select “Create Boot Media using MDT”. Specify an empty folder for the boot media to be created in and click Next. Name your boot media and click Next.
CreateBootMedia

We’ll create x86 Boot Media (but x64 will work too!). Click Next. On the components screen, make sure  you select .NET Framework or all of your hard work will have been in vain. I enjoy having Powershell available so I’ll add that too! Click Next
AddComponents

Here is where we get the option of adding a prestart command. DO NOT add the Wizard here! The reason being: This prestart command will trigger anytime your boot media is used. In certain task sequences you may reboot to WinPE using the assigned boot image. If you put your wizard in the prestart command here, anytime you rebooted to it, you’d have your wizard pop up. You may add additional files if you include extra tools in your boot image, or a custom background. I like to leave the F8 Command Prompt option available for troubleshooting sake.
BootMediaOptions

Click Next and Next once more to complete the wizard. Once this is complete, distribute your boot media to your Distribution Point(s).

Create the Bootable Media ISO

Right-click the Task Sequences item and select “Create Task Sequence Media”. Select Bootable Media and click Next. Select Dynamic Media and click Next. Select CD/DVD Set and pick an output location for the iso file. Click Next. If you wish set a password, otherwise leave the options default and click Next. Select your Boot Media, Distribution Point, and Management Point(s) and click Next.

Now for the prestart command! This prestart command differs from the previous in which your prestart command will only be seen when booting from this media you’re creating. Place a Checkbox next to “Enable Prestart Command”, put the name of your EXE in the box and select the package you created for your Wizard along with a distribution point. Click Next.
AddPrestart

Review the Summary and click Next to complete the Wizard. Place your ISO onto a USB, mount to a VM or setup with PXE and check out the magic!

WinPE Startup
WinPEStartup

Wizard Loaded
WizardLoaded

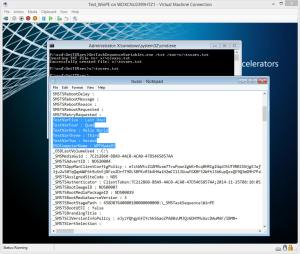
Once our task sequence takes off we can verify our variables using the GetTaskSequenceVariables.exe that was presented within Part 1 and voila!
VariableReport

If you have experience with WPF and want to pick apart my code, please don’t :). Yes, I realize accessing and object’s property directly (if (osdVarNameTwo.Text != “” && osdVarValTwo.Text != “”)) is bad practice, however for the demo’s sake and for simplicity, it works fine!

Hopefully this gives you the information needed to start creating your own .NET WinPE Wizard! Obviously we didn’t do anything too extravagant, but this should give you the starting point and inspiration needed!

My complete solution and code is here!

Enjoi!

WinPE and .NET (Part 2): Creating and Editing Variables

In Part 1 we saw how to prepare a visual studio solution to be able to access the OSD Environment as well as obtain one specific or all of our task sequence variables. In there I linked a full solution that allows you to get all of those variables in a variety of file formats (txt, csv, xml, etc…).

In Part 2, I’ll be going over creating and setting Task Sequence variables via c# and .NET. If you have not read Part 1, please do. There are some important references and steps that need to be performed in order to properly access the environment.

As highlighted in Part 1, we need to:

  1. Extract and create our DLL (If you did this in Part 1, you can reuse this DLL)
  2. Create a solution setting the target framework to “.Net Framework 4”
  3. Reference the assembly in your solution

Now, just like we did in Par 1, we’ll need to create an instance of our Task Sequence environment:

ITSEnvClass TsEnvVar = new TSEnvClass();

If you recall the way we obtained variable names was using the GetVariables method of our Task Sequence Environment Instance. To get the value of a specific variable we accessed this by:

TsEnvVar["VariableName"];

Creating and Setting variables is just as easy! In fact, its the exact same! With our Task Sequence Environment Instance (TsEnvVar):

TsEnvVar["VariableName"] = "VariableValue";

Really…that’s all there is to it! I’d like to say there’s more magic behind this but really there isn’t!

To help with your own implementations of this, I’ve created a helper class that can be used for getting and setting variables. While is is very basic, it does give a good ‘skeleton’ to work with. I’ve used this class in countless projects for both my company and other experiments/tests I’ve done. You can view this class here.

Up Next: In Part 3 I’ll go through a very quick and basic Task Sequence Wizard using WPF and C#!


Enjoi!

WinPE and .NET (Part 1): Get Task Sequence Variables

When WinPE greeted me with the “.NET Framework” component I thought nothing of it…Then I decided to use it and couldn’t have seen more opportunity than when I first saw OSD.

I plan to make this a series of posts utilizing the .NET Framework with OSD ranging from the basics of Getting Task Sequence Variables, Setting Task Sequence Variables, and even adding these to make a visually rich WPF Task Sequence Wizard. I’ll focus on the C# language that Microsoft has made so easy to love. Although, keep in mind all these things can be done with C++ and .NET as well.

First things first we need the necessary dll in order to use the Task Sequence Environment.

Let me break and mention that there are 2 examples out there that explain this part a bit more than I will and may also provide more details for you:

Whether or not you’re following my blog or one of the two references there are a few prerequisites:

Creating the Necessary DLL

First we’ll need to crack open our boot media and get the tscore.dll file. We’ll use the handy DISM tool to do this:

  1. Get a SCCM Boot media ISO and mount it.
  2. Open the appropriate folder for your architecture and grab the tscore.dll file:
    1. <root>\SMS\bin\i386\tscore.dll
    2. <root>\SMS\bin\x64\tscore.dll
  3. Copy this locally.
  4. You’ll need to run the type library importer (tlbimp.exe) against this. As mentioned in John Socha-Leialoha’s blog above, this is specific to the .NET version you’ll be compiling in and installed to the boot media. A safe bet is .NET 4.0 (at least at this point in time) so we’ll go with that:
  5. “%WindowsSdkDir%\Bin\TlbImp” <PathFromStep3>\TSCore.dll”
  6. This will spit out a TsEnvironmentLib.dll file for us to import to Visual Studio.

Importing the DLL

For those of you familiar with adding references this should be fairly straight forward:

  1. Create your solution in Visual Studio and make sure to set the Target Framework to .NET Framework 4.
  2. In the Solution Explorer right-click References
  3. select Add Reference
  4. Click Browse and select the dll.
  5. Add the appropriate “using” to your code and you’re ready!

Getting Task Sequence Variables

There are a lot of variables in a Task Sequence and even more if you’re as customized as my solutions usually are. We’ll focus on the built-in variables for simplicity. Here are a few TechNet articles to become familiar with:

In the code we’ll need to get an instance of our Task Sequence Environment:

ITSEnvClass TsEnvVar = new TSEnvClass();

Now we could access any variable (if we know the name of it) which will return the value:

TsEnvVar["OSDComputerName"];

In order to get all of the variables we have set within our OSD environment, simply call the “GetVariables” method of our TSEnvClass instance which returns an array of our variable Names (not values).

object[] x = (object[])TsEnvVar.GetVariables();

You can then loop through the array from the snippet above to get all variables along with their values:

for (int i = 0; i < x.Length; i++)
{
    Console.WriteLine(x[i].ToString() + "\t:\t" + TsEnvVar[x[i].ToString()]);
}

And there we have it! For my own purposes I’ve created a nice little utility that will spit out all of the variables in a variety of formats. The solution is published to my GitHub here.

Up Next, Creating and Editing those variables!


Enjoi!